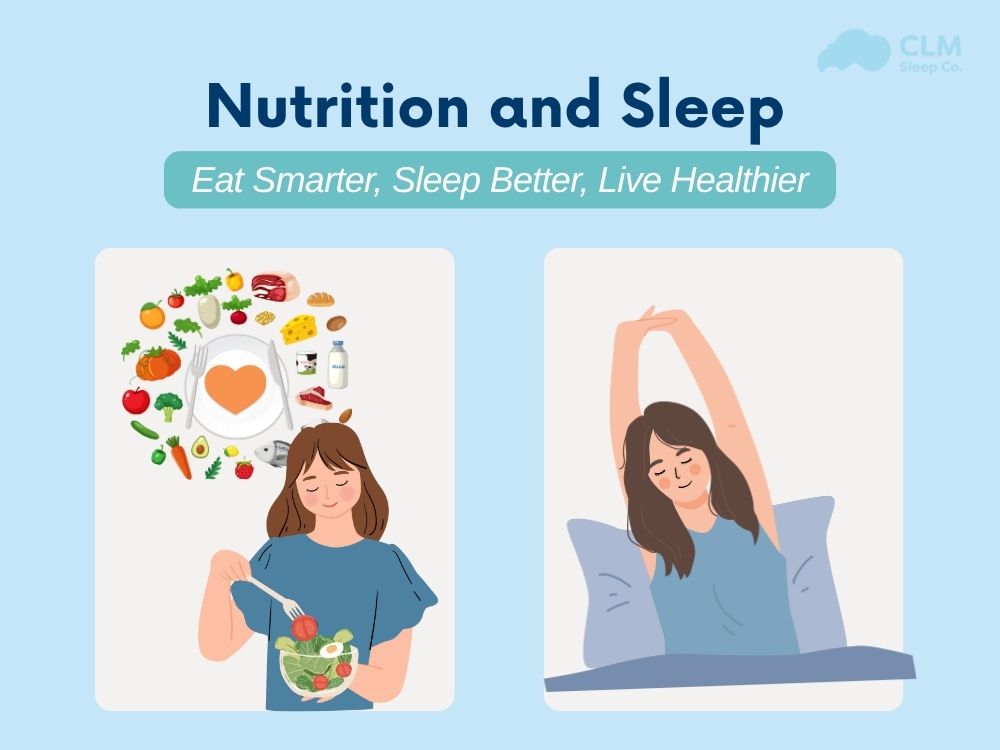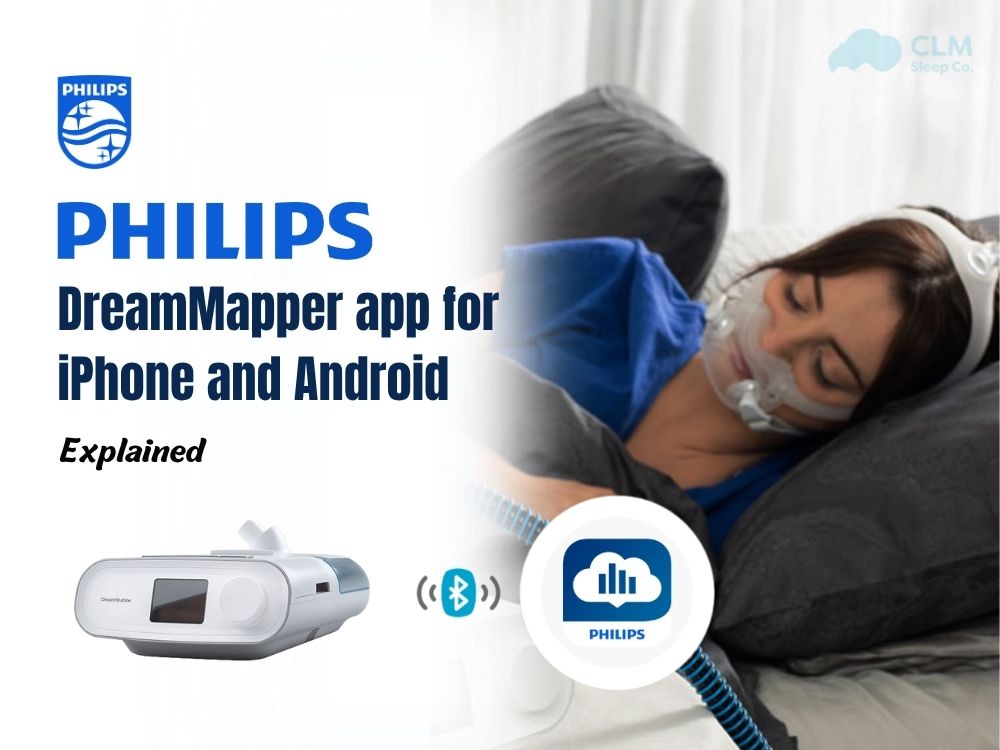
DreamMapper app is a mobile and web platform CPAP application developed by Philips Respironics, helping those who use Philips machines to proactively monitor and manage their home treatment process. This article will provide complete instructions on how to install the app, connect the device, read the results, and troubleshoot any issues during the installation process.
Overview of DreamMapper app
DreamMapper is accessible on Android, iOS, and Windows PC devices. Users can upload their data using the DreamMapper Data Card Uploader. The platform allows users to easily monitor their therapy results, set personal goals, receive educational tips, and get alerts or reminders to help maintain consistent usage.
The data obtained based on AHI, therapy hours, mask fit, and leak rate helps readers stay updated and closely monitor the treatment process quickly and easily. Although the app is designed to be user-friendly, most patients encounter common issues, especially during the initial stages. These problems often involve Bluetooth pairing, data syncing, and interpreting therapy results. Philips addresses these problems through step-by-step guidance within the app and the user manual. However, you can also contact Philips to quickly resolve the issues you encounter.
Read details: DreamMapperWebUserGuide
How to use Dreammapper app
CLM Sleep will guide you step by step on how to connect and use the DreamMapper
Step 1: Download app
You need to choose the installation method that is appropriate for your device.
- Google Play store (for Android devices)
- Apple App store (for iPhone and iPad)
- Philips website (for Windows PC users via DreamMapper Data Card Uploader)
To ensure the application runs smoothly and reliably, your device must meet the following minimum system requirements:
- Android: Requires Android 8.0 or higher. The device must support Bluetooth to pair with the CPAP machine.
- iPhone/iPad: Requires iOS 14.0 or later. The app is compatible with both iPhone and iPad.
- Windows computers: Must be running Windows 10 or newer. A computer with an SD card reader or USB port is needed to use the DreamMapper Data Card Uploader software.

Read more: Step-by-Step Guide to the DreamMapper App
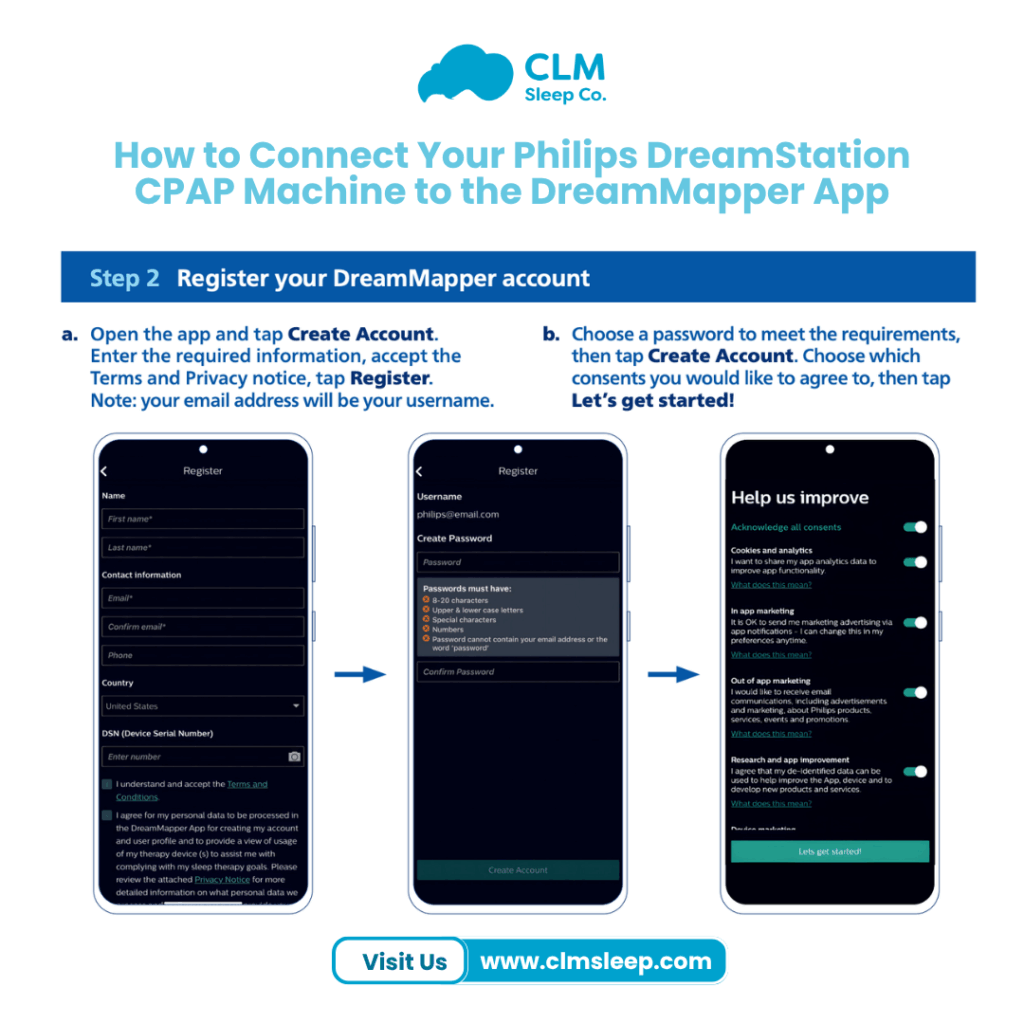
Step 2: Register your DreamMapper account
Enter the required information, read and accept the consents, choose a valid password, review the optional consents, and tap Register to complete the sign-up.
Step 3: Customise your account
You need to accurately identify your mask name. First, select the type of mask and tap Next. Then, choose the specific mask you are using and tap Save to continue. You’ll see a notification permission prompt, you can tap Allow to enable app notifications, or Don’t Allow if you prefer not to receive notifications.

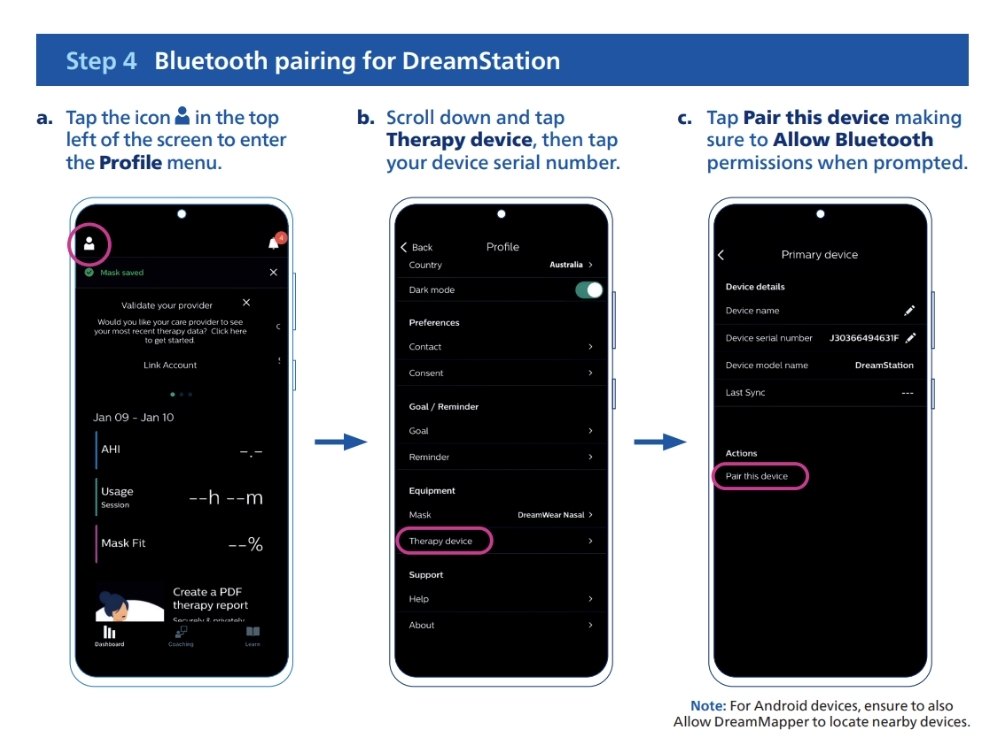
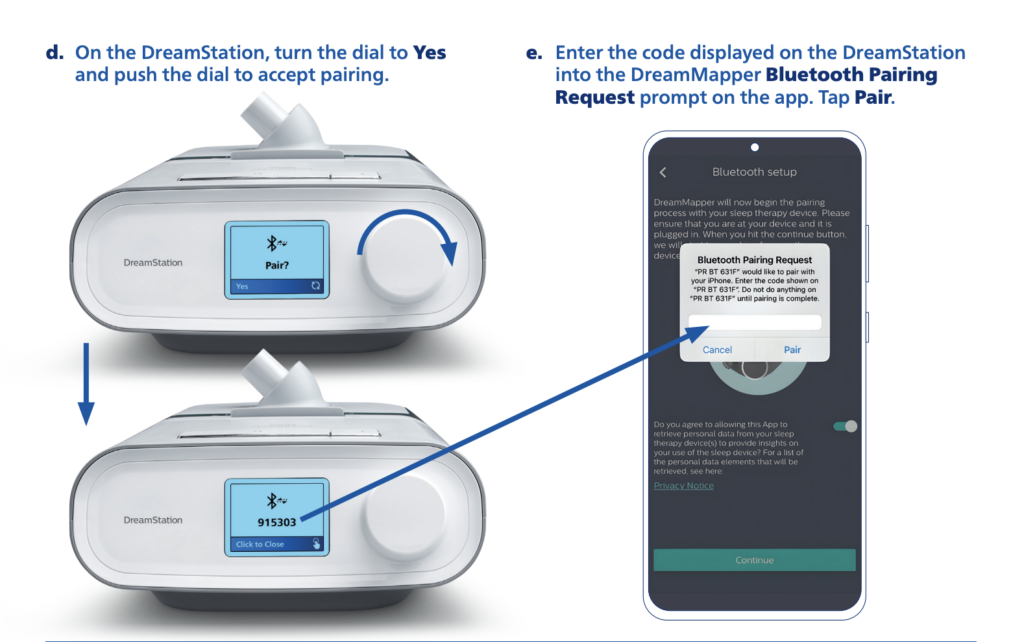
Step 4: Bluetooth pairing for DreamStation
You need to ensure that your DreamStation is powered on and ready to connect. Your phone must have internet access and Bluetooth enabled. After you select “Pair this device,” the DreamStation will display a 6-digit code on its screen (as shown in step d). You need to enter this code into the DreamMapper app when the “Bluetooth Pairing Request” prompt appears.
Step 5: Link DreamMapper to your sleep therapy provider
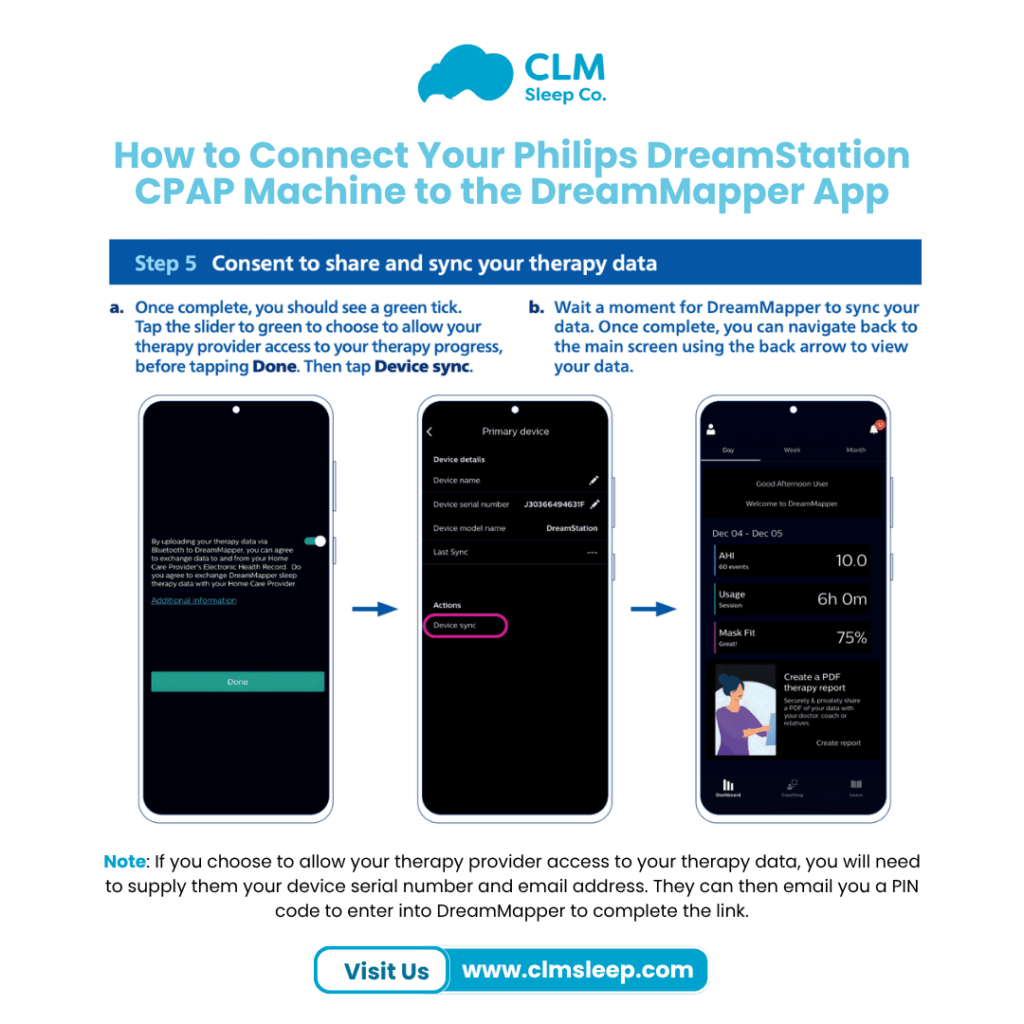
After successfully pairing your DreamStation device with the DreamMapper app, you’ll need to enable data sharing to sync your therapy progress. On the app screen, toggle the slider to green to allow your therapy provider access to your data. Then tap Done, followed by Device sync to begin the synchronization process. This may take a few moments. Once completed, you can return to the main screen to view your therapy information, including usage hours, mask fit, AHI, and other key metrics.
Note: If you choose to allow your therapy provider access to your data, you’ll need to provide them with your device’s serial number and the email address associated with your DreamMapper account. They will send you a PIN code to enter into the app to complete the connection.
How can I read the dreammapper results?
DreamMapper is a powerful tool from Philips that allows you to track your sleep therapy success. Learning how to read DreamMapper data will help you manage your therapy more efficiently, resulting in improved sleep and health outcomes.
When you open the app, the dashboard displays important sleep therapy data, including:
Sleep Hours: The total number of hours you spent using the CPAP machine at night. Aim for at least four hours of successful therapy.
AHI (Apnea-Hypopnea Index): The number of apnea/hypopnea incidents per hour. Lower is better (less than 5 is deemed normal).
Mask Fit: Determines whether your mask is leaking. A good fit improves therapy effectiveness.
Therapy hours: include the number of nights and average daily usage. It aids in monitoring consistency.
Understanding your DreamMapper data can help you track the effectiveness of CPAP therapy and enhance your overall sleep health. Here’s how to read the key metrics:
AHI (Apnea-Hypopnea Index) indicates the number of times per hour your breathing stops or becomes shallow during sleep. A reading below 5 is generally considered within the normal range.
Leak Rate measures the amount of air escaping from your CPAP mask. A high leak rate can reduce the effectiveness of your therapy and may suggest that the mask doesn’t fit properly or the seal is worn.
Therapy Adherence refers to how consistently and how long you use your CPAP device. Most healthcare providers and insurance companies recommend using it for at least 4 hours per night on 70% of nights.
Conclusion
By understanding key metrics like AHI, Leak Rate, and Therapy Adherence, you can take an active role in managing your sleep apnea treatment. With the DreamMapper app, tracking your progress becomes easier and more effective, helping you stay informed, improve mask fit, and maintain consistent therapy usage. Regular monitoring not only supports better sleep but also contributes to your overall health and well-being.